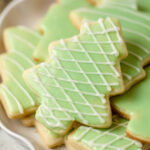
Peppermint Christmas Tree Cookies
These Peppermint Christmas Tree Cookies are a simple roll-out cookie recipe with peppermint flavoring. The cookie dough is easy to roll out and made with melted butter instead of softened butter, so it's easy to mix together without an electric mixer. These are so pretty in your holiday cookie box!Note: Because the butter and sugar isn't creamed together the same way as traditional recipes, the cookies have a little more texture in their surfaces--if this bothers you then you can use your favorite sugar cookie recipe and just follow the instructions for icing the cookies.
Servings: 24 cookies
Calories: 149kcal
Ingredients
Cookies:
- 10 tablespoons unsalted butter melted and cooled for 10 minutes
- ¾ cup granulated sugar 5.25 ounces
- 1 large egg
- ½ teaspoon peppermint extract OR 1 teaspoon vanilla extract
- 1 ⅔ cups all-purpose flour 8.35 ounces
- ½ teaspoon baking powder
- ¼ teaspoon salt
Sugar Cookie Icing:
- 2 ¼ cups powdered sugar, sifted 9 ounces
- 1 ½ tablespoon light corn syrup
- 3-5 tablespoons milk
- ½ teaspoon peppermint extract OR 3/4 teaspoon vanilla extract
- green food coloring gel style preferred
- sprinkles optional
- additional powdered sugar for thickening as needed
Instructions
Make the Cookies:
- Pour melted and cooled butter into a medium bowl and add granulated sugar. Stir until the mixture is totally combined. It should be thick and shiny. Stir in egg and peppermint extract until combined and smooth, about 60 seconds.
- Add the flour, baking powder, and salt into the bowl with the other ingredients and use a spatula or spoon to stir together until combined. Dough will be very soft.
- Chill dough for 2 hours or up to overnight.
- Preheat oven to 350°F. Line two baking sheets with parchment paper.
- After chilling, sprinkle a clean countertop with powdered sugar. Sprinkle the dough as well and roll out using a rolling pin. Roll to 1/8” thickness. Cut Christmas trees with a cookie cutter. Note: Combine scraps and place dough back in fridge while the first batch is baking and cooling. Re-roll scraps 1x. Any cookies after that will be a little tough and messy-looking. I give these ones to my kiddos who are always eager to taste-test.
- Arrange Christmas trees 1.5” apart on parchment lined baking sheets and bake one sheet at a time for 9-10 minutes. Check at 7-8 minutes to be sure you don’t overbake. You want just the tiniest bit of golden brown on the edges.
- Cool cookies completely before decorating.
Make the Icing:
- Combine 3 tablespoons of the milk along with the other icing ingredients (except food coloring and sprinkles) into a medium bowl. Whisk until smooth, adding more of the milk as needed.
- Frosting should drizzle from a smooth ribbon from the whisk and hold its shape on top of the bowl of icing before the drizzles start to soak back into the icing.
- Adjust consistency: If it’s too thick, add a little more milk (1 teaspoon at a time), if it’s too thin, add a little more powdered sugar (a few tablespoons at a time). Note that thicker icing will get used up faster, so that may affect yield if it is too thick.
- Optional: If you want to decorate the cookies as shown, set aside about ¼ cup frosting and leave it white.
- Color the remaining icing green with a small amount of green food coloring.
- Hold a cookie upside down by the edges and dip face-first into the icing. You are just dipping the front of the cookie.
- Lift and allow the excess icing to drip for 3-4 seconds. Quickly flip the cookie, gently wiggle it to spread icing, and set on a wire rack or lined cookie sheet to set. Pop any bubbles or swipe away drips quickly with a toothpick.
- Decorating ideas: If you want sprinkles, add them immediately. The icing begins hardening quickly.If you want to pipe designs on the cookies, then wait for the green layer to dry completely (a few hours). Then, fill a small piping bag fit with a small round tip (or just cut the very end of the piping bag) and pipe designs onto your cookies with the white icing.
- Allow cookies to harden at room temperature for several hours (4+ hours ideally) before carefully stacking and storing. I like to place a piece of wax paper between each layer when storing. I’ve carefully stacked multiple layers of cookies with no problems.
Notes
Yield: Recipe yield will vary pending the size of your cookie cutter. My Christmas tree cutter is about 2.75” from base to top of the tree.
To store leftover icing: leave the leftover icing in a bowl and lightly cover the surface with plastic wrap (the wrap should touch the top of the icing) and then store in an airtight container in the fridge for 3-5 days.
To store iced cookies: Cookies with dry icing can be kept at room temperature (store in a sealed airtight container) or in the fridge. Store for 3-5 days. I haven’t frozen cookies with this icing recipe yet, but I’ll update when I do. I think it should work fine!
Nutrition
Calories: 149kcal | Carbohydrates: 25g | Protein: 1g | Fat: 5g | Saturated Fat: 3g | Polyunsaturated Fat: 0.3g | Monounsaturated Fat: 1g | Trans Fat: 0.2g | Cholesterol: 20mg | Sodium: 38mg | Potassium: 17mg | Fiber: 0.2g | Sugar: 18g | Vitamin A: 159IU | Calcium: 11mg | Iron: 0.5mg